RecSysでは、推薦システムの社会的責任性を議論するためのワークショップを開催しており、FAccTRec: Workshop on Responsible Recommendationで中心的に議論されています。このワークショップは5年目であり、比較的新しいワークショップであることがわかります。オーガナイザーには産総研の神嶌先生*3の名前もあります。
This article is going to be about Artillery, a popular load and smoke testing framework.
Recently I used Artillery to evaluate the performance of some of our production services. I'd like to present some of the scenarios I encountered, and ways to solve them. So if you're new to load testing, I hope this article can serve as a helpful introduction to Artillery.
Now let's get started!
Regarding the code samples
Note that in the below samples, everything will be installed into a local folder we create. So you can follow along and run all of these samples without needing to install anything on your machine globally. So there's no worry about side-effects or changes to the configuration on your system, you can simply delete the folder when you are done!
In these samples, I'm going to be using a publicly-available test REST API service known as JSONPlaceholder as the server. The public version is available at https://jsonplaceholder.typicode.com/, but instead we're actually going to run this same code locally -- because Artillery is designed to put heavy load on the server, we do not want to cause problems for this free and useful service!
Creating and running tests
Installation
Create a local directory that we'll use to install the dependencies and run our tests
mkdir load-testing
cd load-testing
Install Artillery (and also module csv-parse which we'll need later)
We set the location of the server with target: http://localhost:3000
In the phases: section we configure to for 60 seconds with 10 simulated users
In the scenario "Run queries" we make a GET request to one of the endpoints (this loops until the time is up)
To run it:
./node_modules/artillery/bin/run run load-testing.yml
Reading test cases from a CSV file (payload files)
The above is well and good so far, but we're just requesting the same data from the same resource repeatedly. For most systems this will allow every request to be served from cached code and data, so it isn't a very good simulation of real-world usage.
Therefore we'd like to vary the resources and parameters to provide more realistic testing, but it would be a bit unwieldy to hard code each value into the YAML file. This is where "payload" files come in -- we store these parameters in a CSV file, so we can easily create and change test cases without needing to modify the code.
# load-testing.yml

config:
  target: "http://localhost:3000"
  payload:
    path: "queries.csv" # path is relative to the location of the test script
    skipHeader: true
    fields:
      - resource
      - queryparam1
      - queryparam2
      - queryparam3
  phases:
    - duration: 60
      arrivalRate: 10
      name: "Run queries"

scenarios:
  - name: "Run queries"
    flow:
      - get:
          url: "/{{ resource }}?{{ queryparam1 }}&{{ queryparam2 }}&{{ queryparam3 }}"
Now we have the parameters in the CSV. In the payload: section we define the location of the file and variable names for each field, then in Run queries we use these variable names. The nice thing is that Artillery will advance to the next CSV row each time automatically for us!
Creating an initial test data set
With the test server we've been using the data is just static JSON, so it's easy to make every test run start out with a consistent dataset. When testing real services however, you may need to use an API to populate the initial data. Fortunately, it is possible to do this in Artillery without needing additional external tools -- we can use a "processor" (custom Javascript plugin) and put this into the before block (initialization code which runs before the test cases).
// utils.js

const fs = require("fs")
const parse = require('csv-parse')

function loadCsvIntoJson(context, events, done) {

    fs.readFile(context.vars['csvFilePath'], function (err, fileData) {
        parse(fileData, {columns: false, trim: true}, function(err, rows) {
            // CSV data is in an array of arrays passed to this callback as `rows`
            context.vars['csvRows'] = rows
            context.vars['row'] = 1

            done()
        })
    })
}

function getNextRow(context, events, done) {
    let row = context.vars['row']

    context.vars['userId'] = context.vars['csvRows'][row][0]
    context.vars['id'] = context.vars['csvRows'][row][1]
    context.vars['title'] = context.vars['csvRows'][row][2]
    context.vars['completed'] = context.vars['csvRows'][row][2]

    row++
    context.vars['row'] = row

    done()
}

function hasMoreRows(context, next) {
    return next(context.vars['row'] < context.vars['csvRows'].length)
}
Until now these examples have simply hard-coded many values, but in a real-world test automation setup we probably want to separate configuration from code (many teams use .env as a standard place to store secrets)
For our setup, .env was the way to go, but Artillery doesn't support this itself. Fortunately there is a tool called dotenv-cli which can run any arbitrary executable with the variables from .env loaded into its environment. You can install this by running
npm install --save dotenv-cli
For example, we might put the location of the server into our .env file:
# .env
ARTILLERY_TARGET=http://localhost:3000
Then we can load this from the environment in the yaml file:
Most of these are pretty self-explanatory, but the meaning of "p95" and "p99" might not be immediately obvious. From the documentation:
Request latency is in milliseconds, and p95 and p99 values are the 95th and 99th percentile values (a request latency p99 value of 500ms means that 99 out of 100 requests took 500ms or less to complete).
These are socket level errors where the client couldn't connect to the server. As you increase the number of users and requests, you'll eventually reach a limit where the service cannot process all of the incoming requests.
Authorization - when the api requires an access token
In our case, our API server requires an authentication token. You can add this to the HTTP headers for requests (where access_token is the token returned by your authentication function):
JSONPlaceholder (the free server we used) is based on a framework called JSON Server, which is an extremely powerful tool that allows you to create a mock REST server from any arbitrary JSON in just a few minutes! It can very useful for development and testing.
Conclusion
That's it for this article! I hope you found it useful and I encourage you to check out the Artillery Docs if you are interested to learn more!
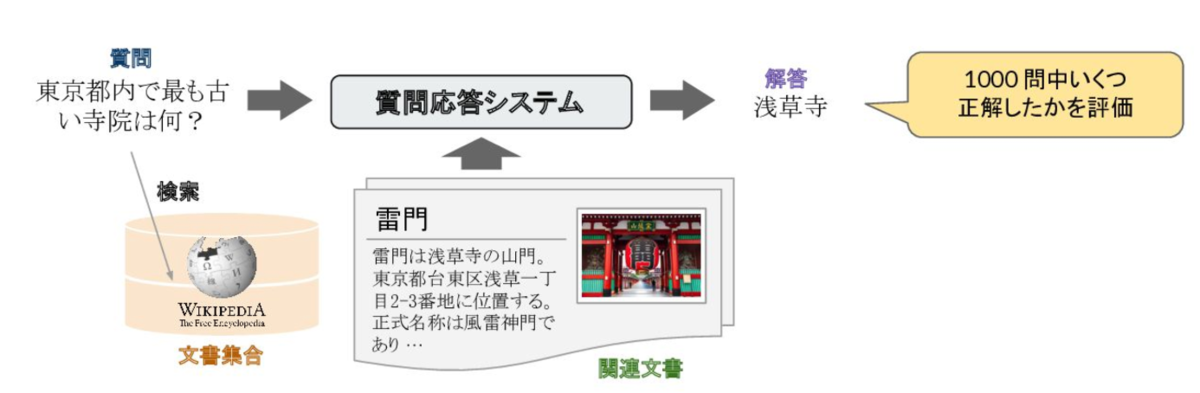
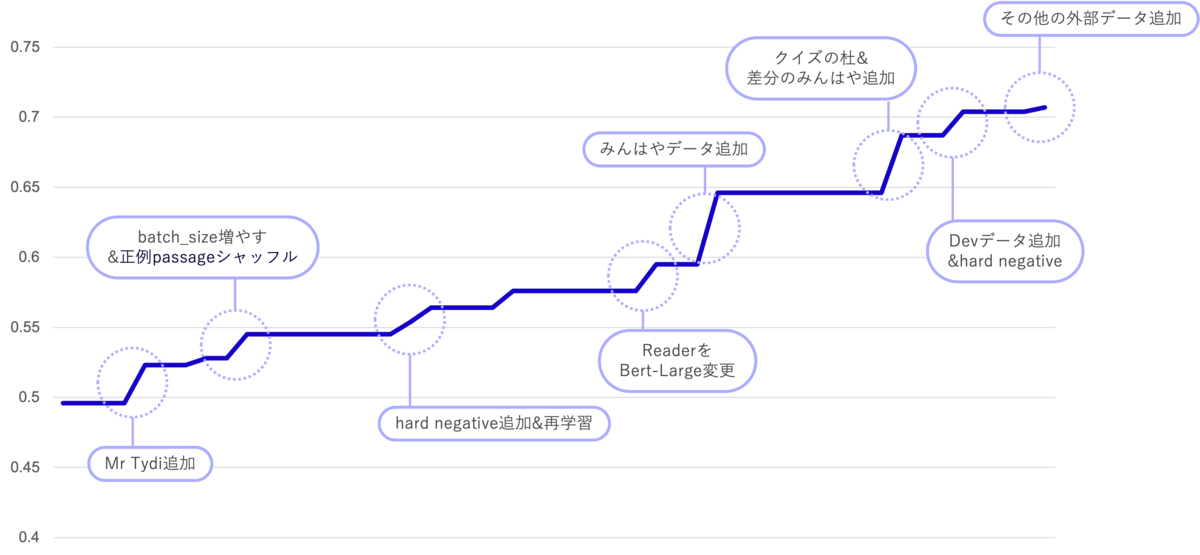
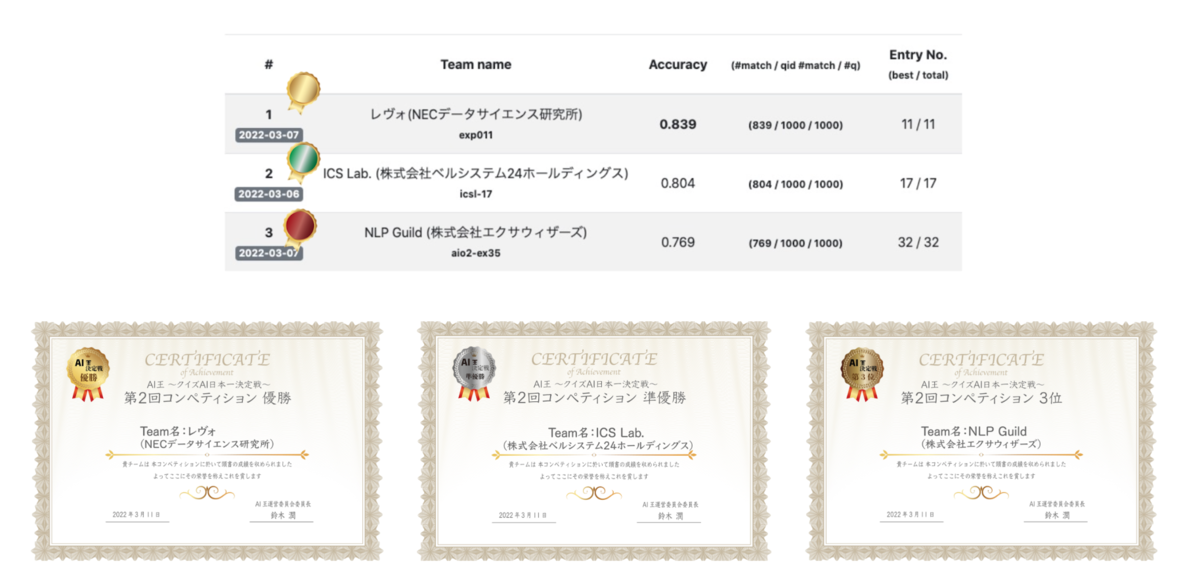
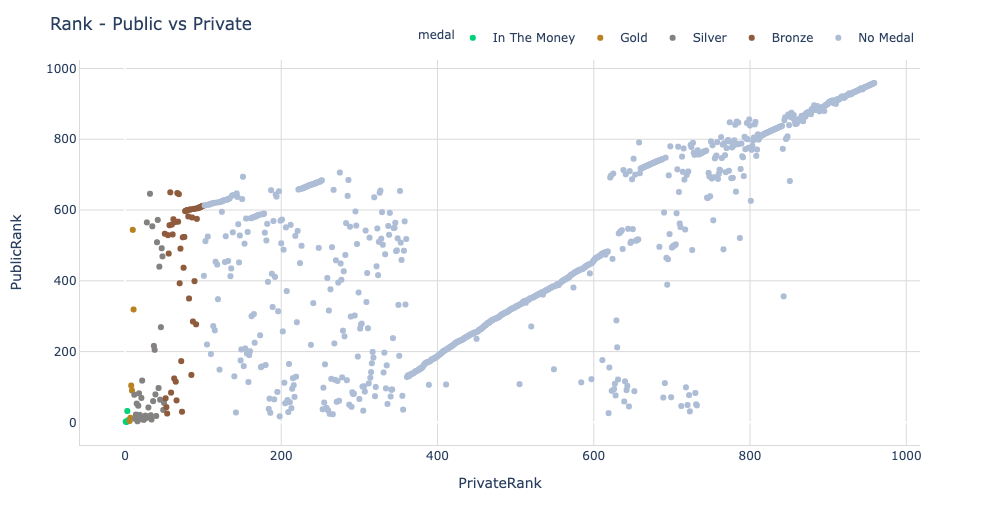
今回、AI/機械学習を用いたデータ分析技術の国際的なコンペティションプラットフォームKaggle上で2021年8月 ~ 2021年11月まで開催されていたchaii - Hindi and Tamil Question Answeringコンペ(略: chaiiコンペ)に参加し、私を含む "tkm kh" というチームで943チーム中2位に入賞&金メダルを獲得することが出来ました。
序盤は、初参加でしかもソロ参加だったため、勝手が分からず、「Submission CSV Not Found」を連発し、苦労しました。ただ、参加したのがコンペ終了まで残り1ヶ月を切った頃で、すでに公開コードやディスカッションが充実していたため、取り掛かりやすく、タイミング的には良かったと思っています。一方で、他の参加者(特に上位陣)と比較すると、自分は実験の数が圧倒的に足りなかったなと思いました。より高いスコアを目指す為には、公開されているノートブックやdiscussionなどの情報を単に鵜呑みにするのではなく、問題の本質を見抜く為に自分の頭でしっかり考え、データを確認し、その上で多くの実験を繰り返すことが重要だと感じました。
Adoption of Git Flow・Brief explanation of Git Flow
In the last article, I mentioned that we adopted GitLab Flow for our API / Frontend deployment flow and branching strategy.
However, I thought that GitLab Flow or GitHub Flow would be incompatible with our mobile release process because of the following factors:
We need to update the version number for each release.
A review from Apple / Google is needed for each release, so we cannot release all the time
On the other hand, some companies use trunk-based development as the release flow for mobile apps.
However, trunk-based development more suitable for relatively large-scale app development and deployment schedules, such as releasing once a week, and I thought that it did not match the current state of our mobile development.
For the above reasons, I chose Git Flow, for our mobile app deployment flow branching strategy.
To make the rest of this explanation easier to understand, let's take a brief look at Git Flow.
① Create a feature branch from the develop branch when you add a new feature. When its task and review are done, merge this to the develop branch.
② Create a release branch from the develop branch when it's ready for preparing the release.
③ After some checks and modifications on the release branch, merge this to the develop・master branches.
④ After merging the release branch to the master branch, add a tag and release to production (For mobile development, submit the app to Apple Store Connect)
⑤ If there are fatal bugs after release, hotfix release. First, create a hotfix release branch from the master branch.
⑥ When you have finished fixing and checking on the release branch for the hotfix and are ready to release, merge it into the master・develop branch and release it again to the production environment.
In the next section, I'll explain how we achieved continuous delivery within this Git Flow.
Continuous Delivery of iOS using GitHub Actions + Fastlane
Create release branch and Pull Requests
When the development on the develop branch described in ① has progressed and you are ready to release, you can create the release branch described in ②.
Create release branch
Release branches are often created manually, but in this case, I was able to automate the process by using GitHub Actions + Fastlane.
First of all, we want to use Semantic Versioning to specify the release version.
With Semantic Versioning, we can regularize the versioning of releases by a Major, Minor, and Patch version increase. (I won’t explain Semantic Versioning in-depth here, as it's already explained well on other websites).
Semantic Versioning
Fastlane provides an Action called increment_version_number and it increments the version number bypassing parameters(Major, Minor, Patch).
And below Fastlane will do the followings:
Increment the version number based on Semantic Versioning and commit files.
Create a release branch and push to GitHub
Create a Pull Request to the master and develop branches
Currently, increment_version_number only supports iOS, the below article describes how to increment version number automatically for Android.
Finally, we'll make this Fastlane run via GitHub Actions
There are several types of workflow triggers in GitHub Actions, but in this case, we will use workflow_dispatch, which can be triggered manually from the GitHub Action UI, since we want to be able to run at any time.
Also since workflow_dispatch also accepts arguments, we can pass Major or Minor for this upgrade (Patch is only used for hotfix releases, so we won't use it here).
workflow_dispatch on GitHub Actions
By doing this, I was able to automate the process of updating the release version and creating release branches and pull requests by triggering the workflow by specifying Major or Minor in the GitHub Actions UI.
Pull Requests to master・develop branches
File diff for version updates
Merging two Pull Requests at the same time
In the previous step, two pull requests were automatically created from the release branch to the master・develop branches.
Then, as explained in section ③, when the release branch is ready to be released, you can merge it into the master・develop branches.
Of course, you can merge the two pull requests manually, but there is a possibility that you might forget to merge one of them.
To merge the two pull requests at the same time without forgetting, I created the following GitHub Actions workflow.
This workflow allows you to merge two pull requests for the develop and master branches at the same time if you add the label release to the pull request.
Creating a Tag & GitHub Release, submit App Store Connect
When the release branch is merged into the develop・master branches and a new commit is made in the master branch, you can create a tag and release it to the production environment as described in ⑤ in Git Flow. In the case of iOS development, this is often the time to submit to App Store Connect.
Creating a Tag & GitHub Release triggered by a commit to the master branch can be automated with the following GitHub Actions.
Creating Tag & GitHub Release
We will also build and upload the release version of the app to App Store Connect at this time.
The Deliver Action allows you to not only upload to Apple Store Connect, but also upload metadata screenshots, submit, and automatically release after approval.
Hotfix release
The above is the normal release flow.
In addition to the regular release flow, we will conduct a hotfix release if a serious bug is found after the release.
Follow the steps ⑤ and ⑥ to create a release branch for the hotfix from the master branch, and then merge it into the master/develop branch for release.
When we do a hotfix release, we follow Semantic Versioning and update only the Patch part (x.x.0 → x.x.1).
Then, in GitHub Actions, checkouts from the master branch create a release branch and Pull requests.
Then, after the fix and confirmation on the hotfix release branch is done, you can do the same thing as a normal release
Add the label release to the Pull Request and merge it into the master・develop branch.
After the commit is made on the master branch, a Tag & GitHub Release is automatically created, and the release version app is submitted to App Store Connect.
Although not directly related to Git Flow, I will also briefly explain how to use GitHub Actions to distribute debug apps.
To check the behavior of the application before release, we often use the following services to distribute and check the debug version of the application.
You can automate the building and uploading of the debug version of your app using GitHub Actions.
With Git Flow, you can trigger it when you finish feature development on the feature branch and merge it into the develop branch, or when you commit to the release branch.
The workflow in GitHub Actions is as follows.
In the above workflow, we have a workflow_dispatch as a trigger, in addition to committing to a specific branch.
When you are developing a feature in ①, you may often find yourself in a situation where you don't want to merge it into the develop/release branch yet, but you want to build and distribute a specific feature branch.
You can specify the branch and trigger workflow in GitHub Actions page, using workflow_dispatch.
workflow_dispatch
Summary
Finally, I'll summarize the steps I've taken so far in using GitHub Actions for iOS continuous delivery.
【Normal release flow】
Create a feature branch, merge it into the develop branch
When you are ready to prepare the next release, go to the GitHub Actions page and trigger the workflow for preparing the next release. You should choose the bump type parameter(major or minor).
GitHub Actions checks out the develop branch, bumps the version based on the parameter, creates a release branch, and creates Pull Requests to develop・master branches.
At this time, the debug version of the app will be built and distributed to Firebase App Distribution, so you can check its behavior with actual devices.
When it is time to release, Add the label release to Pull Request and merge it into the develop・master branches at the same time.
Commits are made to the master branch, automatic Tag & GitHub Release creation, and submission to App Store Connect.
【Hotfix release flow】
When you're ready to prepare a hotfix release, run the hotfix release preparation workflow from the GitHub Actions UI
Update the release version (Patch), create a release branch, and create Pull Requests to the master・develop branch.
Commit the bug fix to the above release branch.
Each commit to the release branch automatically builds a debug version of the app and distributes it to Firebase App Distribution, so you can check how it works on an actual device.
Once the fix is confirmed, Add the label release to Pull Request and merge it into the develop and master branches at the same time.
Commits are made to the master branch, and a Tag and GitHub Release are automatically created and submitted to App Store Connect.
This has allowed us to complete most of the work required for the release on GitHub!
(Depending on how much of the work to Apple Store Connect is automated by Fastlane's Deliver action.)
While releases in mobile app development tend to be less frequent than API and front-end development, there is a lot of work that needs to be done for a release.
With this continuous delivery process, I hope to become:
Able to release app improvements to the market with more agility
The GitHub Actions workflow described in this article is based on the self-hosted runner, so there are some differences between it and the GitHub host runner.